Local Development Setup¶
This guide explains how to set up and run the Delta project locally for development.
Table of Contents¶
- Prerequisites
- Additional Tools
- ngrok Installation
- Local Email Testing with SendGrid
- 1. Clone the Repository
- 2. Install Dependencies
- 3. Environment Configuration
- 4. QStash Local Development Setup
- 4.1. Create Your Own Upstash Account
- 4.2. Enable QStash Local Mode
- 4.3. Local Tunnel
- 5. Running Locally
- 5.1. Refreshing Local Supabase Database
- 5.2. Seeding Rich Demo Data
- 5.3. Resetting the Local Database
- 6. Accessing Services
- 7. Claude Code Integration (Optional but Recommended)
- Hooks (Automatic)
- Plugins (Manual Install)
- Skills Available
- 8. Stopping Services
Prerequisites¶
Ensure you have the following software installed on your system:
- Node.js: (LTS version recommended, e.g., v18.x or v20.x) - Download Node.js
- Yarn: (Version
4.2.2is used in this project) - Install Yarn - Docker Desktop: Required for running LocalStack and Supabase services. - Download Docker Desktop
- Supabase CLI: For managing the local Supabase instance. - Install Supabase CLI
- AWS CLI: For interacting with LocalStack (e.g., creating SQS queue). - Install AWS CLI
- PostgreSQL Client Tools (
pg_dump,psql): Required by therefresh-local-db-from-remotescript to migrate data from your remote Supabase project. - macOS (Homebrew):
brew install postgresql@15 && brew link --force postgresql@15 - Debian/Ubuntu:
sudo apt update && sudo apt install postgresql-client - Windows: Install PostgreSQL from the official website, ensuring "Command Line Tools" are selected during installation and the
bindirectory is added to your PATH.
Additional Tools¶
ngrok Installation¶
ngrok is a useful tool for creating secure tunnels to your local development server, especially helpful for testing webhooks, sharing your local app with team members, or testing on mobile devices.
Installation Instructions¶
- macOS (Homebrew):
brew install ngrok/ngrok/ngrok
- Windows:
- Download ngrok from the official website
-
Extract the executable to a folder in your PATH (e.g.,
C:\Windows\System32or create a dedicated folder and add it to PATH) -
Linux:
# Download and install via snap
snap install ngrok

# Or download directly
curl -s https://ngrok-agent.s3.amazonaws.com/ngrok.asc | sudo tee /etc/apt/trusted.gpg.d/ngrok.asc >/dev/null
echo "deb https://ngrok-agent.s3.amazonaws.com buster main" | sudo tee /etc/apt/sources.list.d/ngrok.list
sudo apt update && sudo apt install ngrok
Setup and Usage¶
-
Sign up for an ngrok account at ngrok.com (free tier available)
-
Authenticate ngrok with your account:
ngrok config add-authtoken YOUR_AUTHTOKEN
(Replace YOUR_AUTHTOKEN with the token from your ngrok dashboard)
- Basic usage to expose your local app:
# Expose the app running on port 3000
ngrok http 3000

# Expose with a custom subdomain (requires paid plan)
ngrok http 3000 --subdomain=my-app
- Useful ngrok features for development:
- Inspect requests: ngrok provides a web interface at
http://127.0.0.1:4040to inspect all requests - Custom domains: Configure custom domains in your ngrok dashboard
- Multiple tunnels: Use
ngrok.ymlconfig file to run multiple tunnels simultaneously
Integration with Delta Project¶
When using ngrok with this project, you may need to update environment variables to use the ngrok URL for webhooks or external service callbacks:
# Example: Expose your local app and use the ngrok URL for webhooks
ngrok http 3000

# Then update your webhook URLs in external services to use:
# https://abc123.ngrok.io instead of http://localhost:3000
Note: Remember to update any CORS settings or allowed origins in your application configuration when using ngrok URLs.
Local Email Testing with SendGrid¶
To test email functionality locally using SendGrid webhooks, you'll need to set up ngrok and configure SendGrid to forward emails to your local development environment.
Prerequisites¶
- ngrok installed and authenticated (see above)
- Postman installed for API testing
- Access to the database vault for SendGrid API key
Setup Process¶
- Start your local development environment:
# First, start the project using the development script
./scripts/macos-linux/start-dev.sh  # On macOS/Linux
# or
scripts\windows\start-dev.bat       # On Windows
Wait for the application to be fully running on http://localhost:3000
- Start ngrok tunnel:
# In a new terminal, expose your local app
ngrok http http://localhost:3000
Note the ngrok URL (e.g., https://abc123.ngrok.io)
- Import Postman collections:
- Import the SendGrid collection:
docs/getting-started/postmanCollections/sendgrid/Twilio.postman_collection.json -
Import the environment file:
docs/getting-started/postmanCollections/sendgrid/Sendgrid.postman_environment.json -
Configure SendGrid API key:
- Retrieve the
sendgrid_api_keytoken from the database vault -
In Postman, update the environment variables with your SendGrid API key
-
Update SendGrid parse settings:
- In the Postman collection, find the "4. Update the parse setting" request
- Replace the webhook URL in the request body with your ngrok URL
- Example:
https://abc123.ngrok.io/api/webhooks/sendgrid - Execute this request to configure SendGrid to forward emails to your local instance
Testing Email Reception¶
Once configured, you can test email reception:
- Find a project email address:
- Query the
projectstable in your database - Look in the
metadatacolumn for project-specific email addresses -
Example format:
fileName_code@localdev.docs.farmcove.co.uk -
Send a test email:
- Send an email to the project email address you found
- The email should be forwarded by SendGrid to your local ngrok tunnel
- Your local application will receive and process the email webhook
Troubleshooting¶
- Ensure your local app is running and accessible via the ngrok URL
- Verify the SendGrid webhook URL is correctly configured with your current ngrok URL
- Check ngrok's web interface (
http://127.0.0.1:4040) to monitor incoming webhook requests - Ensure your local application has the proper webhook endpoint configured to handle SendGrid requests
Note: Remember to update the SendGrid webhook URL whenever you restart ngrok, as the URL will change each time (unless using a paid ngrok plan with custom domains).
Additional Use Case: The same ngrok URL can also be used for WhatsApp webhook configuration. Simply use your ngrok URL (e.g., https://abc123.ngrok.io) as the webhook URL in your WhatsApp Business API settings for local testing of WhatsApp bot functionality.
1. Clone the Repository¶
If you haven't already, clone the project repository:
git clone <your-repository-url>
cd delta
(Replace <your-repository-url> with the actual URL of your Git repository.)
2. Install Dependencies¶
Install all project dependencies using Yarn from the project root:
yarn install
3. Environment Configuration¶
This project uses .env.local files for environment-specific variables.
- App Environment (
packages/app/.env.local): Copy the example filepackages/app/.env.local.exampletopackages/app/.env.local. Then, openpackages/app/.env.localand replace the placeholder values with your actual credentials and settings. The structure of the file will be similar to this:
NEXT_PUBLIC_SUPABASE_URL=http://localhost:54321
NEXT_PUBLIC_SUPABASE_PUBLISHABLE_KEY=YOUR_SUPABASE_PUBLISHABLE_KEY_FROM_SUPABASE_START
SUPABASE_SECRET_KEY=YOUR_SUPABASE_SECRET_KEY_FROM_SUPABASE_START
AIHUB_API_GATEWAY_URL=http://localhost:3001/enqueue-task
AIHUB_CUSTOM_SHARED_KEY=generate_a_strong_secret_for_app_to_aihub
VERCEL_AUTHORIZATION_API_KEY=generate_a_strong_secret_for_aihub_to_app

# Loki Logging (for server-side logs, including client logs ingested via API)
LOKI_URL=http://localhost:3100
LOKI_USER=your_loki_user_replace_me
LOKI_PASSWORD=your_loki_password_replace_me
SEND_DEV_LOGS_TO_LOKI=false # Optional: set to true to send dev logs to Loki
NEXT_PUBLIC_SEND_DEV_LOGS_TO_LOKI=false # Optional: set to true to send client dev logs to Loki
YOUR_SUPABASE_PUBLISHABLE_KEY_FROM_SUPABASE_STARTandYOUR_SUPABASE_SECRET_KEY_FROM_SUPABASE_STARTwill be provided when you runsupabase startfor the first time (see "Running Locally" section). You must update these.- Replace the placeholder shared keys (
generate_a_strong_secret...) with your own strong, random strings. You could also runsupabase statusif the database is already started to see these values. -
Configure
LOKI_URL,LOKI_USER, andLOKI_PASSWORDif you intend to use Loki for logging. Thecommonlogger (used by app server-side operations) will use these variables.SEND_DEV_LOGS_TO_LOKIcan be set totrueto enable Loki logging in development environments.NEXT_PUBLIC_SEND_DEV_LOGS_TO_LOKIcontrols whether client-side errors are sent to Loki in development. Refer topackages/app/.env.local.examplefor these variables. -
aiHub Environment (
packages/aiHub/.env.local): Copy the example filepackages/aiHub/.env.local.exampletopackages/aiHub/.env.local. Then, openpackages/aiHub/.env.localand update the placeholder values. The structure of the file will be similar to this:
# aiHub Service Configuration
PORT=3001
AWS_REGION=ap-southeast-2
SQS_QUEUE_URL=http://localhost:4566/000000000000/my-queue
VERCEL_API_BASE_URL=http://localhost:3000
VERCEL_AUTHORIZATION_API_KEY=YOUR_AIHUB_TO_APP_SHARED_SECRET_REPLACE_ME
VERCEL_AUTOMATION_BYPASS_SECRET=YOUR_VERCEL_AUTOMATION_BYPASS_SECRET_REPLACE_ME
PROCESSING_DELAY_MS=1000
AWS_ACCESS_KEY_ID=test
AWS_SECRET_ACCESS_KEY=test
NODE_ENV=development

# Loki Configuration for aiHub service logging
LOKI_URL=http://localhost:3100
LOKI_USER=your_loki_user_replace_me
LOKI_PASSWORD=your_loki_password_replace_me
SEND_DEV_LOGS_TO_LOKI=false
NEXT_PUBLIC_SEND_DEV_LOGS_TO_LOKI=false
- Ensure
VERCEL_AUTHORIZATION_API_KEYis identical to the one set in the app's.env.local. - Set
VERCEL_AUTOMATION_BYPASS_SECRETto a strong, random string for automation bypass functionality. -
Configure Loki variables if you intend to use Loki for
aiHubservice logging. -
Supabase Backend Secrets (
packages/database/supabase/.env.local): For scripts that interact with your remote Supabase database (likerefresh-local-db-from-remote), you'll need to provide your remote database password. - Copy the example file
packages/database/supabase/.env.local.exampletopackages/database/supabase/.env.local. - Edit
packages/database/supabase/.env.localand set your actualREMOTE_DB_PASSWORD,REMOTE_DB_POOLER_HOST, andREMOTE_DB_POOLER_USER. You can find the pooler host and user in your Supabase Dashboard under Project Settings > Database > Connection info (use the Session Mode Connection Pooler URI, e.g.,postgresql://<POOLER_USER>:<PASSWORD>@<POOLER_HOST>:5432/postgres).
# In packages/database/supabase/.env.local
REMOTE_DB_PASSWORD="your_actual_remote_supabase_database_password_here"
REMOTE_DB_POOLER_HOST="your_project_specific_pooler_host.supabase.com" # e.g., aws-0-region.pooler.supabase.com
REMOTE_DB_POOLER_USER="postgres.yourprojectref" # e.g., postgres.abcdefghijklmnop

# Optional: Override for local Supabase instance password.
# If not set here, the script tries to use the password from the auto-generated .env file
# (created by 'supabase status --output env'), or defaults to "postgres".
# LOCAL_POSTGRES_PASSWORD="your_custom_local_password"
-
Important: Ensure
packages/database/supabase/.env.localis listed in your root.gitignorefile (it has been added during this setup). This file should never be committed to version control. -
Local Login Phone Number (
LOCAL_TEST_PHONE_NUMBER):
For local development you log in as the seeded "John Lennon" user. By default that user's phone is a fake placeholder (641111111111) and you log in with OTP 111111 (no real SMS is sent — Twilio is bypassed via Supabase's [auth.sms.test_otp] table).
You can override the placeholder with your real phone number so you can log in with your actual number locally — still without any SMS being sent.
- Open packages/database/supabase/.env.local.
- Set:
 ```env
 # Country code + number, no plus sign. Example: 64224603619
 LOCAL_TEST_PHONE_NUMBER=64XXXXXXXXX
 ```
- On the next
./scripts/macos-linux/start-dev.sh(orscripts\windows\start-dev.bat):packages/database/supabase/config.tomlis regenerated fromconfig.toml.template, mapping your number to OTP111111in[auth.sms.test_otp].packages/database/supabase/seeds/local_user.sqlis regenerated from its template; on the nextsupabase db reset --local, it rewrites John Lennon's seeded phone (auth.users,auth.identities,public.users) to your number.
- Both files are gitignored (your number never reaches the repo). If
LOCAL_TEST_PHONE_NUMBERis unset or equal to641111111111, the override is a no-op and you log in with the placeholder.
⚠️ If you change
LOCAL_TEST_PHONE_NUMBERwhile Supabase is already running, the auth container has cached the old value. Runsupabase stop && ./scripts/macos-linux/start-dev.shto pick up the change, then./scripts/macos-linux/reset-local-db.sh(see §5.3) so the seed updates the user row.
- Demo Data Generator Path (
DELTA_DEMO_GENERATOR_PATH, optional):
The companion repo deltaDemoDataGenerator seeds rich demo data (24 transactions, budgets, approvals, WhatsApp conversations, etc.) on top of seed.sql. You can wire it into the local-reset flow:
- Clone deltaDemoDataGenerator (sibling of delta is convenient).
- In packages/database/supabase/.env.local, set:
 ```env
 # Absolute or relative-to-project-root path
 DELTA_DEMO_GENERATOR_PATH=../deltaDemoDataGenerator
 ```
- Now
./scripts/macos-linux/reset-local-db.sh(or.bat) runssupabase db reset --local, then automaticallycds into the generator and runsnpm run generate:clean && npm run seed:local. - If unset, the script just runs the reset and skips the demo seed.
4. QStash Local Development Setup¶
Upstash QStash is used for queue-based task processing in the application. For local development, each developer needs their own Upstash account to avoid conflicts with production/staging environments.
4.1. Create Your Own Upstash Account¶
Important: Each developer must create their own Upstash account for local development. This is necessary because enabling Local Mode in Upstash is per-account, not per-team. If you enable Local Mode on the production/staging account, it will break production/staging functionality.
- Create a free Upstash account:
- Go to Upstash Console
- Sign up for a free account if you don't have one already
-
Complete the account setup process
-
Navigate to QStash:
- Once logged in, go to the QStash section in your account
-
You should see your QStash dashboard
-
Copy your QStash credentials:
-
Find and copy the following values from your QStash dashboard:
QSTASH_TOKENQSTASH_CURRENT_SIGNING_KEYQSTASH_NEXT_SIGNING_KEY
-
Update your local environment variables:
- Open
packages/app/.env.local - Replace the existing QStash values with your personal account credentials:
QSTASH_TOKEN=your_personal_qstash_token
QSTASH_CURRENT_SIGNING_KEY=your_personal_current_signing_key
QSTASH_NEXT_SIGNING_KEY=your_personal_next_signing_key
4.2. Enable QStash Local Mode¶
Important: You must first start your local development environment using ./scripts/macos-linux/start-dev.sh (see Section 5) before enabling Local Mode. The QStash tunnel needs to be running locally for the console to connect.
- Start your local development environment:
./scripts/macos-linux/start-dev.sh
Wait for the message showing "QStash tunnel started" and note the displayed QStash URL.
-
Access your QStash Console: Navigate to your personal QStash dashboard at https://console.upstash.com/qstash
-
Enable Local Mode: Toggle the "Local Mode" switch in the console interface:

- Wait for Connection: After enabling, the console will open a popup that shows a "Connecting to local tunnel..." message. Wait for it to establish connection with your local development environment:
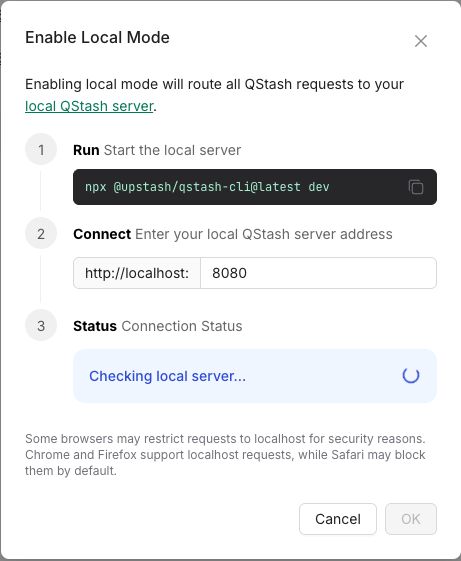
- Confirm Connection: Once connected, you'll see a success message. Click "OK" to confirm:

4.3. Local Tunnel¶
The start-dev.sh script automatically starts the QStash local development tunnel using:
yarn dlx @upstash/qstash-cli@latest dev
This tunnel:
- Connects your local environment to the Upstash QStash service
- Routes queue messages to your local development server
- Displays the tunnel URL from your
.env.localconfiguration - Automatically stops when you stop the development environment (Ctrl+C)
Important: The QStash tunnel URL in your .env.local file (QSTASH_URL) must match the URL configured in your Upstash account for the tunnel to work correctly.
5. Running Locally¶
Convenience scripts are provided in the scripts/ directory to start and stop the local development environment.
- On macOS/Linux: First, make all macOS/Linux scripts executable (you only need to do this once):
chmod +x scripts/macos-linux/*.sh
To start all services:
./scripts/macos-linux/start-dev.sh
- On Windows: To start all services:
scripts\windows\start-dev.bat
The start-dev script will:
- Clean up previous builds by removing
distfolders and TypeScript build info files from the packages directory. - Check prerequisites including Supabase CLI and AWS CLI.
- Ensure Docker Desktop is running and start it automatically on macOS if needed.
- Start a LocalStack container (named
delta-localstack) with SQS services. - Create the SQS queue (
my-queue) in LocalStack if it doesn't exist. - Start the local Supabase services (
supabase start). This ensures the local Supabase instance is running and accessible. (The first time this runs, it will output API keys. Note these down to updatepackages/app/.env.local). - To perform a full refresh of your local Supabase database (reset with local migrations, then mirror schema and data from remote), use the
scripts/macos-linux/refresh-local-db-from-remote.sh(orscripts/windows/refresh-local-db-from-remote.bat) script (see section 4.1). - Generate/update the Supabase .env file to ensure local database credentials are available.
- Start the QStash local development tunnel to connect with Upstash QStash service for queue processing.
- Automatically open the app URL (http://localhost:3000) and Storybook (http://localhost:6006) in your default browser.
-
Run
yarn devfrom the project root to start all development services including: -
Next.js app
- Storybook (component library documentation)
- aiHub service
- SQS processor simulator (automatically included as part of the workspace)
The script will then show logs from all running services via yarn dev.
SQS Processor Simulator¶
The SQS processor simulator runs automatically as part of yarn dev through the @delta/aihub-sqs-processor workspace package. This local Lambda function simulator:
- Monitors the LocalStack SQS queue for new messages (polling every 5 seconds)
- Starts new aiHub processes in single-task mode when messages are received (simulating how Lambda starts Fargate tasks in production)
- Processes tasks independently - each message triggers a separate aiHub process running on a different port
- Handles cleanup by deleting successfully processed messages from the queue
- Provides debugging support with inspector ports for each spawned process (starting from port 9245)
This simulation ensures your local development environment behaves identically to the production event-driven architecture, where:
- Production: App → aiHub
/enqueue-task→ SQS → Lambda → Fargate Task → aiHub/process-task - Local: App → aiHub
/enqueue-task→ LocalStack SQS → Local Lambda Simulator → aiHub single-task process
You don't need to do anything - this process runs automatically in the background and handles the event-driven processing flow.
5.1. Refreshing Local Supabase Database (Schema & Data from Remote)¶
To perform a full refresh of your local Supabase database—resetting it with your local migrations and then mirroring both schema and data from your remote Supabase project—use the refresh-local-db-from-remote utility scripts. These scripts manage the entire lifecycle for this operation, including starting Supabase services if they are not running, and stopping them upon completion.
This workflow is useful when you want your local environment to be an exact replica (schema and data) of a remote environment, after applying any committed local migrations as a base.
scripts/macos-linux/refresh-local-db-from-remote.shscripts/windows/refresh-local-db-from-remote.bat
How they work:
- Ensure Supabase local services are running (starts them if necessary).
- Reset the local database using
supabase db reset --local. This clears the local database and applies all migrations from yourpackages/database/supabase/migrations/folder. This step ensures your local, committed migrations are applied first. - Dump the
publicschema from your remote Supabase project by constructing a DSN (connection URI) withREMOTE_DB_POOLER_HOST,REMOTE_DB_POOLER_USER,REMOTE_DB_PASSWORDfrom.env.localand port5432, then usingpg_dump --dbname="<DSN>" --schema-only --clean. - Apply this remote schema dump to your local database using
psql. This aligns your local schema with the remote schema. - Dump data from your remote Supabase project's
publicschema by constructing and using a similar DSN withpg_dump --dbname="<DSN>" --data-only. - Apply this remote data dump to your local database using
psql. - Clean up temporary dump files.
- Stop the Supabase local services.
Prerequisites for this script:
REMOTE_DB_PASSWORD,REMOTE_DB_POOLER_HOST, andREMOTE_DB_POOLER_USERmust be set inpackages/database/supabase/.env.local(see Section 3.3).- PostgreSQL Client Tools (
pg_dump,psql) must be installed and in your system's PATH (see main "Prerequisites" section).
How to run:
- On macOS/Linux:
Ensure the script is executable:
chmod +x scripts/macos-linux/refresh-local-db-from-remote.shMake sureREMOTE_DB_PASSWORD,REMOTE_DB_POOLER_HOST, andREMOTE_DB_POOLER_USERare set inpackages/database/supabase/.env.local. Then run from the project root:
./scripts/macos-linux/refresh-local-db-from-remote.sh
- On Windows:
Make sure
REMOTE_DB_PASSWORD,REMOTE_DB_POOLER_HOST, andREMOTE_DB_POOLER_USERare set inpackages/database/supabase/.env.local. Then run from the project root:
scripts\windows\refresh-local-db-from-remote.bat
Important Notes:
- This script always mirrors both schema and data from the remote database's
publicschema after applying local migrations. The localseed.sqlfile is not used by this script. - Your local migration files in
packages/database/supabase/migrations/are applied first during thesupabase db reset --localstep. The subsequent schema dump from remote will then overlay this. This means if your local migrations define schema that also exists on remote, the remote version (as captured bypg_dump --schema-only --clean) will ultimately define the structure. If local migrations are ahead of remote, those changes will be applied, then potentially altered/overwritten by the remote schema dump. - This script is a standalone operation and will stop the Supabase services when it finishes. If you want Supabase to keep running for general development (e.g., with
yarn dev), usescripts/macos-linux/start-dev.shorscripts/windows/start-dev.batto start services. - Troubleshooting
pg_dumphostname error: If you encounter an error likepg_dump: error: could not translate host name "db.your-project-id.supabase.co" to address..., it means your system cannot resolve the Supabase database hostname. - Verify the
project_idinpackages/database/supabase/config.tomlis correct. - Check your internet connection and DNS settings.
- Try to
ping db.your-project-id.supabase.co(replacingyour-project-idwith your actual project ID).
5.2. Seeding Rich Demo Data (deltaDemoDataGenerator)¶
packages/database/supabase/seed.sql already creates the Beatles test users (John, Paul, George, Ringo), the Farm Cove organization, and the Monsoon Melody project skeleton — enough to log in and click around. For a richer scenario (24 transactions across all workflow states, full budget, payment methods, approvals, WhatsApp conversations, attachments, the featured crew member Sanjay Bhatia with onboarding documents), use the deltaDemoDataGenerator companion repo.
One-time setup¶
- Clone the generator as a sibling of the
deltarepo:
cd ..                                        # next to your delta/ folder
git clone <deltaDemoDataGenerator-repo-url>
cd deltaDemoDataGenerator
npm install
Final layout:
Development/
  delta/
  deltaDemoDataGenerator/
- Configure environment files:
cp .env.local.example .env.local       # for local Supabase seeding
cp .env.staging.example .env.staging   # for staging seeding (optional)
.env.local does not need editing in most cases — the generator auto-reads local Supabase credentials from ../delta/packages/database/supabase/.env (auto-generated by start-dev.sh).
.env.staging requires the staging SUPABASE_URL and SUPABASE_SERVICE_ROLE_KEY from the team's password manager.
Seeding local¶
You have two options:
Option A — automated via reset-local-db.sh (recommended). Set DELTA_DEMO_GENERATOR_PATH in packages/database/supabase/.env.local (see §3.5). Then a single command resets the local DB and re-runs the generator:
./scripts/macos-linux/reset-local-db.sh   # macOS/Linux
scripts\windows\reset-local-db.bat        # Windows
See §5.3 for details.
Option B — manual. After running npx supabase db reset --local from packages/database/supabase/:
cd ../deltaDemoDataGenerator
npm run generate:clean    # generates PDF/CSV files into output/
npm run seed:local        # populates Farm Cove / Monsoon Melody with rich demo data
seed:local is non-interactive (uses fixed values matching seed.sql's Beatles users and organizations) and idempotent — re-run any time. It augments the existing Farm Cove org and Monsoon Melody project rather than recreating them, so it never conflicts with seed.sql.
Seeding staging¶
npm run seed:staging
This is interactive and prompts you for organization, project name, approver, etc. It prints a red banner and a confirmation prompt before writing to staging.
Safety¶
- The generator hard-rejects any
SUPABASE_URLcontaining the production hostname. seed.sqlitself contains a runtime guard (app_environment()) that prevents it from running against any non-local database.
5.3. Resetting the Local Database (with optional demo seeding)¶
scripts/macos-linux/reset-local-db.sh (and scripts\windows\reset-local-db.bat) wraps the local-reset workflow into one command:
cd packages/database/supabasesupabase db reset --local— re-runs all migrations, thenseed.sql, thenseeds/local_user.sql(the per-developer phone override).- Reads
DELTA_DEMO_GENERATOR_PATHfrompackages/database/supabase/.env.local. If set,cds into that path and runsnpm run generate:clean && npm run seed:local. If unset, just exits after the reset.
Run it from the project root:
./scripts/macos-linux/reset-local-db.sh   # macOS/Linux
scripts\windows\reset-local-db.bat        # Windows
See §3.5 for DELTA_DEMO_GENERATOR_PATH configuration.
6. Accessing Services¶
Once everything is running, you can access the services at these default URLs (the start-dev script also reminds you of these when it finishes, and the individual services log their URLs during startup):
- App:
http://localhost:3000 - Storybook:
http://localhost:6006(component library documentation) - aiHub API:
http://localhost:3001 - Supabase Studio:
http://localhost:54323(or as shown in thesupabase startoutput) - LocalStack SQS (AWS CLI target):
http://localhost:4566
Important: After the first successful run of scripts/macos-linux/start-dev.sh (or supabase start within it), make sure to copy the anon key and service_role key from the supabase start output into your packages/app/.env.local file.
7. Claude Code Integration (Optional but Recommended)¶
If you're using Claude Code (Anthropic's AI coding assistant), the project includes pre-configured hooks, skills, and rules. Most configuration is shared via .claude/settings.json and works automatically. You only need to install the recommended plugins.
Hooks (Automatic)¶
Hooks are pre-configured in .claude/settings.json and work automatically for all developers:
- PostToolUse (file formatting): Runs Prettier, ESLint, and TypeScript checks after every file modification. Blocks writes if there are errors. Script located at
.claude/hooks/claude-code-file-hook.sh(macOS/Linux) or.claude/hooks/claude-code-file-hook.bat(Windows). - PreToolUse (DB protection): Deterministically blocks destructive database commands (
supabase db reset,drop table,truncate) before they execute.
Make the hook script executable (macOS/Linux only):
chmod +x .claude/hooks/claude-code-file-hook.sh
Optional: Desktop Notification Hook (Personal Setup)¶
To get a macOS notification when Claude needs your input, add this to your personal ~/.claude/settings.json:
{
  "hooks": {
    "Notification": [
      {
        "matcher": "",
        "hooks": [
          {
            "type": "command",
            "command": "osascript -e 'display notification \"Claude Code needs your attention\" with title \"Claude Code\"'"
          }
        ]
      }
    ]
  }
}
For Windows, replace the command with:
powershell.exe -Command "[System.Reflection.Assembly]::LoadWithPartialName('System.Windows.Forms'); [System.Windows.Forms.MessageBox]::Show('Claude Code needs your attention', 'Claude Code')"
Plugins (Manual Install)¶
Plugins are installed per-developer (stored in ~/.claude/plugins/). Install the recommended plugins:
claude plugin install supabase
claude plugin install github
claude plugin install playwright
claude plugin install frontend-design
claude plugin install code-review
claude plugin install claude-md-management
claude plugin install claude-code-setup
| Plugin | Purpose |
|---|---|
| Supabase | SQL queries, type generation, migration management directly from Claude |
| GitHub | Rich PR/issue management via MCP tools |
| Playwright | Browser automation for E2E test debugging |
| Frontend Design | Production-grade frontend code avoiding generic AI aesthetics |
| Code Review | 5 parallel review agents with confidence-based filtering (/code-review) |
| CLAUDE.md Management | Audit and maintain CLAUDE.md quality (/revise-claude-md) |
| Claude Code Setup | Analyze codebase and recommend automations (run once) |
Skills Available¶
The project includes custom skills (slash commands):
/build DEV-123— Full build workflow: reads docs, fetches Linear ticket, creates branch, plans (waits for approval), builds, runs checks, finalizes/migration name— Database migration workflow: creates file, writes SQL following all conventions, tests locally, updates docs. Auto-invoked by Claude during builds when DB changes are needed./pr— Pull request workflow: commits, pushes, creates PR against staging, updates Linear. Auto-invoked when you say "commit this", "PR this", etc./code-review— Reviews current PR with 5 specialized agents (from Code Review plugin)
8. Stopping Services¶
-
Stop the Main Application: In the terminal where
start-dev.shorstart-dev.batis running (displaying logs fromyarn dev), pressCtrl+C. This will stop the app, aiHub, SQS processor, QStash tunnel, Storybook, and other Node.js processes managed byturbo dev. -
Stop Background Services (Supabase, LocalStack): After stopping the main application, run the corresponding stop script from the project root:
-
On macOS/Linux:
./scripts/macos-linux/stop-dev.sh -
On Windows:
scripts\windows\stop-dev.batThis will stop the Supabase services and the LocalStack Docker container.